Helpline Number of Warid, Telenor, Ufone, Jazz, Zong

Helpline Number of Warid, Telenor, Ufone, Jazz, Zong
Jazz
24/7 Customer Support (111)
Telenor
Dail 345 from your Telenor Mobile Phone anytime
Ufone
calls to 333 from Ufone prepaid numbers will be charged at Rs. 1.50 + tax per call however charges for speaking to Ufone customer care representative will be reduced from Re.1.00 to Rs.0.75 + tax per call
Warid
Customers can now dial IVR 100 for Rs. 0.25/ – (exclusive of taxes) per call and get all latest promotions updates and activations & deactivation of the Warid Products & Services.
Prepaid Customers will be charged Rs. 0.50/- (exclusive of taxes) per call for dialing Warid Helpline 321 and an additional Rs. 1.50/- (exclusive of taxes) will be charged for connecting to our Customer Service Representative.
Zong
Dail 310 for Helpline from your Mobile Phone against 1 Rupees plus Tax.
http://cmc.zong.com.pk/cmc/CMC.aspx
You can also share your Best Customer Care service experience no matter what kind of services you are currently using like  Warid, Telenor, Ufone, Jazz, Zong.

Change Startup Programs - Windows 8

To change the startup programs in Windows XP and Windows 7, you had to open the System Configuration utility by clicking on Start, then typing in MSCONFIG. Clicking on the Startup tab showed you all of the startup items and you simply unchecked the ones you didn’t want to load when Windows boots.


Computer tips and tricks as well as software, hardware, internet that help make you more productive and your overall computer experience a lot more enjoyable. Computer tips and tricks, tricks,computer tips, computer, tips, information, listing, tip, computer tip, about, windows, internet, internet, ticks, explorer, Microsoft


In Windows 8, if you open MSCONFIG and click on the Startup tab, you now will see a message that it has been moved.


Computer tips and tricks as well as software, hardware, internet that help make you more productive and your overall computer experience a lot more enjoyable. Computer tips and tricks, tricks,computer tips, computer, tips, information, listing, tip, computer tip, about, windows, internet, internet, ticks, explorer, Microsoft


Thankfully, Microsoft decided to at least keep the tab there and redirect users to the new location otherwise lots of people would suddenly be wondering how to manage startup items! In Windows 8, the startup items have moved to the Startup section of Task Manager. Click the Open Task Manager link.


Computer tips and tricks as well as software, hardware, internet that help make you more productive and your overall computer experience a lot more enjoyable. Computer tips and tricks, tricks,computer tips, computer, tips, information, listing, tip, computer tip, about, windows, internet, internet, ticks, explorer, Microsoft


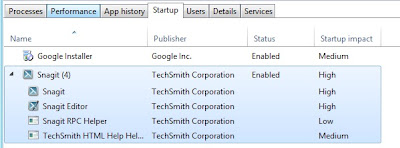
As you can see, I only have one startup item on my Windows 8 system right now. The new thing about Windows 8 is that it also tries to give you a “Startup impact” value so you can quickly see if one particular startup item is really slowing everything down. The values are High, Medium and Low. After a few restarts, you should start seeing the value instead of Not measured.


Computer tips and tricks as well as software, hardware, internet that help make you more productive and your overall computer experience a lot more enjoyable. Computer tips and tricks, tricks,computer tips, computer, tips, information, listing, tip, computer tip, about, windows, internet, internet, ticks, explorer, Microsoft


To disable a startup program in Windows 8, you have to right-click on the item and choose Disable. No more check boxes!


Computer tips and tricks as well as software, hardware, internet that help make you more productive and your overall computer experience a lot more enjoyable. Computer tips and tricks, tricks,computer tips, computer, tips, information, listing, tip, computer tip, about, windows, internet, internet, ticks, explorer, Microsoft


So that’s about it. A slightly different procedure in Windows 8, but overall not a lot of change. Another new thing you might have noticed is that it will actually group all the related processes together (Snagit screenshot above) and tell you the impact of each process. Unfortunately, you can’t disable each item individually, but have to disable the entire group. Maybe before the final release of Windows, they will change it so you can disable individual items in a group.

Shut Down Shortcut on Your Desktop

If you're trying to eliminate every extraneous mouse click, you can shut down your computer with an icon on the desktop.

1). Right-click on your desktop,
2). click "New," and then click "Shortcut."
3). In the "Type the location of the item" field, type "shutdown -s -t 00"

to give you a way to shut down the computer immediately.

if you want to change shutdown to restart (Change the -s to -r to create a reboot shortcut instead.)

Change “AM” and “PM” Displayed Text

http://computertriksno1.blogspot.com
Change “AM” and “PM” Displayed Text To another text like "ante meridiem" and "post meridiem"


Start you for funny changing your change:-
step by step----->
1. Go To Start Menu.

2. Click Control Panel
3. Open Regional & Language Options
4. Go To Regional Options Tab
5. Click Customize Button
6. Go To Time Tab
and type in AM Symbol like "Ante Meridian" and PM Symbol box ante Post Meridian"

http://computertriksno1.blogspot.com


Thanks for like this post ' I am GDDon ' if your are like this post plz click here :

Facebook Messenger on Windows

If you’re a casual Facebook user that mainly uses the popular social network to message and chat with friends, but prefers to avoid things like the extreme amount of apps, invites, games and other add-ons that the site now offers, you may want to consider using Facebook Messenger for Windows, to simplify your Facebook usage. Facebook has mobile apps for Android and iOS, but the Windows desktop Facebook app is a bit different.
Facebook integration with other technology based products is becoming a bit more common. For example, Apple’s upcoming mobile OS that powers the iPhone and iPad, iOS 6, is set to have core Facebook integration. With FB Messenger, you can add a Facebook app to the Windows operating system.
To get started, launch a web browser and navigate to the Facebook homepage. From there, proceed to sign-in to your account.
Once signed in, simply jump to the Facebook Messenger for Windows page.
Click the Install Now button to begin downloading the Facebook desktop software. Facebook will prompt you to begin downloading Messenger. Click the Save File button.
Double click the downloaded FB file to begin the install. From here, the program will download the actual app and install it.
With the software installed on a Windows PC, it should auto launch the desktop app. If not, manually open Facebook Messenger using the path Start > All Programs > Facebook > Facebook Messenger.
From there, you will be presented with a basic Facebook login screen:
Proceed to enter your Email address and Password for Facebook and click the Log In button. From here, you will instantly be presented with the simplistic Facebook Messenger for Windows interface.
Note that aside from basic Facebook chat, this app also provides functions to accept friend requests, view Facebook messages, search Facebook and even view notifications, all from your desktop.
The app is somewhat Skype like or AIM like in nature, but this simplicity is what some casual Facebook users may find preferable.
That’s basically all there is to it. With this basic app, you can use the core, social features of Facebook in a simple, minimalistic desktop window, rather than having to sign in to the site from a web browser. This method of using your Facebook account also prevents several bothersome things that many people may not use, such as the games, apps, surveys, and other crazy things on Facebook these days.
Get a Facebook account, download this app, and use Facebook that way for less games and more simplicity. Thank you for stopping by the site for today’s post.

Change Windows Restriction for any Program

Computer tips and tricks as well as software, hardware, internet that help make you more productive and your overall computer experience a lot more enjoyable. Computer tips and tricks, tricks,computer tips, computer, tips, information, listing, tip, computer tip, about, windows, internet, internet, ticks, explorer, Microsoft


You can add and delete Windows features in this Key shown below. Zero is Off and the value 1 is On. Example: to Save Windows settings add or modify the value name NoSaveSettings to 0, if set to1 Windows will not save settings. And NoDeletePrinter set to 1 will prevent the user from deleting a printer.

The same key shows up at:

HKEY_USERS\(yourprofilename)\Software\Microsoft\Windows\
CurrentVersion\Policies\Explorer so change it there also if you are using different profiles.
1.Open RegEdit

2.Go to 

HKEY_CURRENT_USER\Software\Microsoft\CurrentVersion\Policies
3.Go to the Explorer Key (Additional keys that can be created under Policies are System, Explorer, Network and WinOldApp )

4.You can then add DWORD or binary values set to 1 in the appropriate keys for ON and 0 for off.

NoDeletePrinter - Disables Deletion of Printers
NoAddPrinter - Disables Addition of Printers
NoRun - Disables Run Command
NoSetFolders - Removes Folders from Settings on Start Menu
NoSetTaskbar - Removes Taskbar from Settings on Start Menu
NoFind - Removes the Find Command
NoDrives - Hides Drives in My Computers
NoNetHood - Hides the Network Neighborhood
NoDesktop - Hides all icons on the Desktop
NoClose - Disables Shutdown
NoSaveSettings - Don't save settings on exit
DisableRegistryTools - Disable Registry Editing Tools
NoRecentDocsMenu - Hides the Documents shortcut at the Start button
NoRecentDocsHistory- Clears history of Documents
NoFileMenu _ Hides the Files Menu in Explorer
NoActiveDesktop - No Active Desktop
NoActiveDesktopChanges- No changes allowed
NoInternetIcon - No Internet Explorer Icon on the Desktop
NoFavoritesMenu - Hides the Favorites menu
NoChangeStartMenu _ Disables changes to the Start Menu
NoFolderOptions _ Hides the Folder Options in the Explorer
ClearRecentDocsOnExit - Empty the recent Docs folder on reboot
NoLogoff - Hides the Log Off .... in the Start Menu.
And here are a few more you can play with
ShowInfoTip
NoTrayContextMenu
NoStartMenuSubFolders
NoWindowsUpdate
NoViewContextMenu
EnforceShellExtensionSecurity
LinkResolveIgnoreLinkInfo
NoDriveTypeAutoRun
NoStartBanner
NoSetActiveDesktop
EditLevel
NoNetConnectDisconnect
RestrictRun - Disables all exe programs except those listed in the RestrictRun subkey

This key has many other available keys, there is one to even hide the taskbar, one to hide the control panel and more. I'm not telling you how, as someone may want to play a trick on you. The policies key has a great deal of control over how and what program can run and how one can access what feature.
In the System key you can enter:
NoDispCPL - Disable Display Control Panel
NoDispBackgroundPage - Hide Background Page
NoDispScrSavPage - Hide Screen Saver Page
NoDispAppearancePage - Hide Appearance Page
NoDispSettingsPage - Hide Settings Page
NoSecCPL - Disable Password Control Panel
NoPwdPage - Hide Password Change Page
NoAdminPage - Hide Remote Administration Page
NoProfilePage - Hide User Profiles Page
NoDevMgrPage - Hide Device Manager Page
NoConfigPage - Hide Hardware Profiles Page
NoFileSysPage - Hide File System Button
NoVirtMemPage - Hide Virtual Memory Button
In the Network key you can enter:
NoNetSetup - Disable the Network Control Panel
NoNetSetupIDPage - Hide Identification Page
NoNetSetupSecurityPage - Hide Access Control Page
NoFileSharingControl - Disable File Sharing Controls
NoPrintSharing - Disable Print Sharing Controls
In the WinOldApp key you can enter:
Disabled - Disable MS-DOS Prompt
NoRealMode - Disables Single-Mode MS-DOS
To add or remove programs in the Registry
1.Open RegEdit
2.Go to the desired Key


HKEY_LOCAL_MACHINE\SOFTWARE\Microsoft\Windows\CurrentVersion\Run HKEY_LOCAL_MACHINE\SOFTWARE\Microsoft\Windows\CurrentVersion\RunServices HKEY_CURRENT_USER\SOFTWARE\Microsoft\Windows\CurrentVersion\Run HKEY_CURRENT_USER\SOFTWARE\Microsoft\Windows\CurrentVersion\RunServices

3. Add a new String Value and name it anything you like
4. For the value data, enter the path and executable for the program you want to run.
By adding the value to the HKEY_CURRENT_USER hive instead allows the program to start only when that user is logged on.
If you add the value to the RunOnce key the program will run once and be removed from the key by Windows.

How to Trace an IP Address

How to Trace an IP Address

What they're doing is tracing the Internet Protocol (IP) address of the bad guy. Whenever you go online, your computer is assigned a unique IP address, as is every computer connected to the Internet. An IP address is needed to send and receive information, much like a street address is needed to receive regular mail. Tracing an IP address is not very hard to do, and we'll show you how.
Computer tips and tricks as well as software, hardware, internet that help make you more productive and your overall computer experience a lot more enjoyable. Computer tips and tricks, tricks,computer tips, computer, tips, information, listing, tip, computer tip, about, windows, internet, internet, ticks, explorer, Microsoft

Website IP Address

1. Open a command console. On a Mac, it's called Terminal and it's in the Utilities folder. On a PC, click on Start, then Accessories, and then Command Prompt. This will let us ping any website to find out the IP address of that website.
Ads by Google
Kurta & Kurti Collection
Huge Collection at Unbeatable Price All India Free Shipping, Buy Now !
Jabong.com/Kurta_Kurtis
2. Ping an address. This sends a signal out to a URL—like a sonar, hence the name—which then bounces back with the website information attached, and how long the round trip took.
Type "ping [URL]" - example: ping www.facebook.com.

Computer tips and tricks as well as software, hardware, internet that help make you more productive and your overall computer experience a lot more enjoyable. Computer tips and tricks, tricks,computer tips, computer, tips, information, listing, tip, computer tip, about, windows, internet, internet, ticks, explorer, Microsoft
3. Press return. The IP address should appear beside the website name, followed by how many seconds or milliseconds the ping took.
The format of an IP address is numeric, written as four numbers separated by periods. For Facebook, the IP address is 69.171.237.16.
Computer tips and tricks as well as software, hardware, internet that help make you more productive and your overall computer experience a lot more enjoyable. Computer tips and tricks, tricks,computer tips, computer, tips, information, listing, tip, computer tip, about, windows, internet, internet, ticks, explorer, Microsoft

Email IP Address

1. Open your email client. To find the IP of an email sent to you, you can investigate the message's headers—that stuff that looks like a keyboard exploded on the message.
Computer tips and tricks as well as software, hardware, internet that help make you more productive and your overall computer experience a lot more enjoyable. Computer tips and tricks, tricks,computer tips, computer, tips, information, listing, tip, computer tip, about, windows, internet, internet, ticks, explorer, Microsoft

2. Show headers. From the View menu, select the option that lets you view all or extended headers, and your To/From section will blossom with new information. From all that information, you only need a couple bits to search for.
Next to the Received section you will see something like "from..... and an IP address as described above. Select one of those, and copy it to the clipboard. In this case, we'll select 66.220.144.152, and copy it. We can see that it says Received from mx-out.facebook.com, so we'll do a test to see if that's accurate.
Computer tips and tricks as well as software, hardware, internet that help make you more productive and your overall computer experience a lot more enjoyable. Computer tips and tricks, tricks,computer tips, computer, tips, information, listing, tip, computer tip, about, windows, internet, internet, ticks, explorer, Microsoft

3. Open a command console. This is described above. Only this time, instead of doing a ping on a known address, we're going to run a whois check.
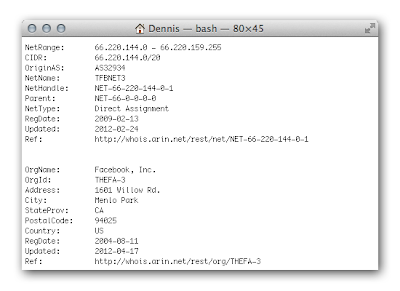
In your terminal window, by the flashing cursor, type whois 66.220.144.152, and press Enter. The information will be sent out to a database, queried, and then returned with the registration information for that IP address.

Computer tips and tricks as well as software, hardware, internet that help make you more productive and your overall computer experience a lot more enjoyable. Computer tips and tricks, tricks,computer tips, computer, tips, information, listing, tip, computer tip, about, windows, internet, internet, ticks, explorer, Microsoft
In this case, we can verify that the message was sent through Facebook. Notice we also have their full address.
4. Use an alternative lookup. You may not want to use the terminal, or perhaps it's not loaded on your computer. Instead, you can try using an internet lookup, such as ip-lookup, which gives you much the same information as a whois lookup, and in many cases, much more.

Change the Start Button Text in Window XP


Stage 1:

Create a system restore point just incase if something goes wrong you can roll back to the primary settings. Make a back up copy of explorer.exe in a safe place, maybe in a different folder. aa

Stage 2:


You would need to download a small freeware utility called Resource Hacker. "Resource HackerTM is a freeware utility to view, modify, rename, add, delete and extract resources in 32bit Windows executables and resource files (*.res). It incorporates an internal resource script compiler and decompiler and works on Win95, Win98, WinME, WinNT, Win2000 and WinXP operating systems." excerpt from Resource Hacker's Website


Click here to download Resource Hacker


Step 3:

Open Resource Hacker utility. Click on File ---> Open. Type "explorer.exe" in the text box.


Step 4:

Expand String Table --->  37 from the tree view and click on 1033 as shown in the figure below


Step 5:

From the right window next to where start is written in front of 578 edit the text to what you want on your start button. For example I edited it to Wintipz as shown in the figure below:


Step 6:


Click on the "Compile Script" button on top of the right window. Now click on File ---> Save as ----> wintipz.exe as shown in Figure Below:


Step 7:
Open registry editor by clicking on Start ---> Run and typing "regedit" at the text box. Navigate to HKEY_Local_Machine -> Software -> Microsoft -> Windows NT -> CurrentVersion -> Winlogon

From the right pane double click on shell and replace "explorer.exe" with "GDDon.exe" as shown in figure below and then exit registry editor:


Step 8: Restart your computer to see the changes.

Hard Drives not opened directly

Image of a Western Digital 250Gb SATA Hard Dri...Image via Wikipedia
This type of problem occurs when you authorize some programs (while downloading files from the internet without knowing what will it do), which will try to amend your system files. They maliciously entered and then over write your system files to run such programs at start-up. Even if you found the
program & delete it, which is creating all this mess. It will remain their after the deletion of such files (programs).
You need to thorough check on the system because it would might spread the virus to the whole system and damage your data, precious files & programs (Installed at your PC). It is also possible due to the virus, which is directing you to open such program, which will corrupt your computer's hard drives or the directories of the drives.
In order to make your PC safer, faster & work smoother you'll need an Anti-virus program to be installed properly. You'll also need some other security software's like Anti-spyware, internet security, Anti-phishing and more relevant to your needs. Try to install compatible Anti-virus software bundled with other utilities which will protect your PC and personal data & identity.
Suggestion: Try to run the software "Ace utilities" or like wise, which will show you the running programs (start-up)and try to un-check the programs which are not required at start-up. I will add some more suggestions if you will Mention the OS and your system (PC make & model) clearly in the comments. So, I will guide you to solve the computer problem with Hard Drives or else.

Repairing computers involves appropriate knowledge of composition and software.


Repairing computers involves appropriate knowledge of composition and software. However, certain concerns can be solved by the user himself if he knows the right process. Understanding of the basics is an essential aspect since dependence on computers has increased immensely these days. Those who cannot do without a computer can save time and money through thorough study. Below are few problems with better solutions that a person must consider whenever he faces any issues.


1) Problem: System Freezing!

System freezing is a common problem that occurs due to faults in software or hardware. Therefore, one must be able to diagnose the problem properly. Such issues either emerge when the user attaches peripherals like scanner, printer etc. or due to driver conflicts. If one finds that the hard drive is the cause behind it, then it is definitely due to excessive heat or insufficient power supply. The solution to this problem is:


  1. The computer should be turned off for a few minutes and then plugged in again. This allows resetting the hardware and clearing the memory.
  2. If the system gets too hot, then one might have to open the computer. The user must first unplug the system and then open it.
  3. After opening the system, one must check the temperature of a component called metal chassis. Also, one must test the fans on rear and front side and ensure that there is no dust at all. One can use a clean cotton cloth for this purpose.
  4. If an additional hard drive has been installed in the system, one must avoid placing them adjacent to each other. This can lead to heating issues. If one desires extra storage, the hard drive should be installed in slots which have DVD or CD ROM drives. Also, one can opt for mounting brackets.
  5. After completing the work, one should always check the cable connections and close the cabinet without exerting much pressure as this might damage the motherboard.
  6. There are situations where system downloads a wrong driver during the Windows update process. This is why it is essential to monitor the status on regularly. After checking everything, one must switch the system on and check it is working fine. If the problem continues, it is advised to restore the computer to the previous configuration which might be helpful.
  7. The process of restoring is: Start option- Programs- Click on accessories- Choose system tools- Click on restore. This will restore all the settings that one has changed.
  8. It is also recommended to check the hard disk since over time it gets cluttered. This has a direct impact on the speed. The bad programs must be eliminated to get enhanced performance.

2) Problem: Loading Program and Applications!

There are instances when a program or application does not load properly. This is termed as the Blue Screen of Death. One must always delete such programs and scan the system with a reliable anti-virus.

3) Problem: Errors in Registry!

All the information related to settings of software as well as hardware is stored in the Windows Registry. Sometimes, the Registry is corrupted due to harmful programs. This can be solved in two ways; either by editing Registry or manually. You can also download PC Optimization software to do it for you. Or hire an expert in this and must always take back up before taking any action.

Submit your URL to Google | Yahoo | Bing

The first step to getting your site online and to get better rankings in Google is to submit your URL to search engines. An example of an URL is www.yoursite.com. Eventually the search engines will find your site but this will help expedite the process.
Once you submit your URL, it could take several days, weeks, or months for the search engines to index your page(s). Results may vary so don’t write this in stone. Factors such as other websites pointing to your site can affect this time as well.

Submit your URL to Google:

1. Go to the following link: http://www.google.com/addurl/?continue=/addurl
2. Type in your URL, example: http://www.yoursite.com
3. Enter comments about your site. This is optional. Usually I enter the genre of the site and a few keywords. Example: Website design in Hollister, CA.
4. Enter the captcha text shown in the box
5. Select “Add URL”

Submit your URL to Bing:

1. Go to the following link: http://www.bing.com/docs/submit.aspx
2. Enter the captcha text shown in the box
3. Type in your URL, example: http://www.yoursite.com
4. Select “Submit URL”

Submit your URL to Yahoo:

**UPDATED NOVEMBER 2012**
1. Go to the following link: http://search.yahoo.com/info/submit.html
2. Click on “Submit Your Site for Free”
3. You will be redirected to Bing. Follow the on-screen instructions for submitting your URL.

Submit your Sitemap to Ask:

**UPDATED AUGUST 2012**
Ask does not have an URL submit feature. Until recently, you could submit your sitemap to them. But Ask.com has now retired this feature and says they will be crawling sites instead. So, the next best thing is to add a directive in your robots.txt file that specifies auto-discovery of the XML sitemap.
Like this:
SITEMAP: http://www.the URL of your sitemap here.xml
The sitemap location should be the full sitemap URL.
That’s it! Once you complete the above steps, just sit back and be patient. It takes time for the search engines to index your pages. If you submit more than once, some search engines may consider this spamming which could result in not indexing your site at all.

Do Not Use an Automated Submission Program

Using an automated submission program to submit to multiple search engines at once may be considered spam attempts and is frowned upon by search engines such as Google.
Also note that you do not have to add all of your URL addresses for your entire site. For example, you do not need to add http://www.yoursite.com/about.hml and http://www.yoursite.com/contact.hml. Simply enter the home page URL and let the engines do the rest.

WiFi HotSpot Creator 2 (Change your Laptop in to Internet router Easy Way)

 
Clicking this download button begins installation of InstallIQ™, which manages your WiFi HotSpot Creator 2 installation. Additional software may be offered to you via opt-in ads during the installation process. Learn More.
  • Instantly share your internet connection
  • Unlimited user sharing
  • Easy to use
  • It's Free!

How does Wi-Fi HotSpot Creator work? Its simple...

Wi-Fi HotSpot Creator shares your internet connection (DSL, Cable, Mobile Broadband Card, Dial-Up, etc) through the built-in wireless card on your computer. It uses the same technology and security that other commercially available Wi-Fi routers use but without the hassle of buying new hardware at your local store. It turns your computer into a Wi-Fi router instantly with the click of a button.

Is it secure? Yes!

You can set a security key (or "passphrase") for your own Wi-Fi network. Only people who have your key will be able to access your shared internet connection.

How do I get started?

Simply download the software by clicking here and follow these steps:
1. Install the software.
2. Start the software.
3. Type a name for your network (Example: "JohnWifi")
4. Type a passphrase for your network (Example: "myprivatepassword")
5. Select the NIC you want to share (Example: If you are hard-wired select "Local Area Connection")
6. Click the "Start" button.
7. Share your password with your friends, family or coworkers who are going to connect and have them look for the name of your network under their wireless network list.
8. Done! Now you're a Wi-Fi superhero....


DOWNLOAD FROM HERE

How to Get any Wifi Password 2013 (FOR KNOWLEDGE PERPOSE ONLY)

This time we bring you the best software to hack the WiFi networks 2013.
The compilation includes powerful encryption software in network
detection and ideal for hacking WiFi networks.
(This is only for knowledge purpose if you forgot your wifi password dont use it on other wifi) 

Importing AutoCAD File Fails (Fix)


When you try to import AutoCAD data you might have seen this series of messages before? First we get a complaint about Elements lost during import.

If it is a Civil3D file that might not be too surprising if they created AEC elements like contours or road elements. Then we get this message.


It's especially confusing if you just were looking at the file in AutoCAD and know there are elements there. Worse you'll probably see the first dialog again if there isn't any data in Paper Space to import either. Even worse is when you find out it is all "your" fault. Well at least in this case it was my fault.

The culprit is saving the DWG file and then attempting to import that DWG file, which happens to be using a newer format than the version of Revit that is being used. In my case it was a AutoCAD 2013 file that I was attempting to open in Revit Architecture 2012. I keep forgetting to save it using the 2010 format. Once the file is saved in a compatible format Revit works much better. Too bad the messages don't give you any clue it is a version thing.

So if you see such messages remember it might just be the file format/version.

Solve : Extra Page Prints With All Document with Details Of Document Every Time Office 2000/2003 and Office 2007 and Above


OFFICE 2000 and 2003

1,Go to the tools menu after open the MS word.


2, Then select "Option"


3, Then select "Print" Tab


4, Now Please be sure the "the document properties" option is unchecked under "Include with document area".


5, Now I briefly discuss regarding MSword 2007 and 2010.

First of all go to the file. Then select "Option", then select "Display". Now please be sure "print documents properties" is unchecked under "printing option"

MS-Word Issue - Every time Print A Extra Page When Printing.


Hello all of you. Hope all of are happy. Today I discuss a simple problem regarding microsoft word. May be we are already fallen this problem. When we want to print in microsoft word, it's print normally, no problem. But a extra page also print. On the other word,  you apply for print one page but it printing two page. That extra page print with document properties. Such as:- Document name, Last modified date etc.That is consume our blank page and also annoying for anyone.

We can solve this problem by follow the following step:-

First of all open the MSword. Then go to "tools" and then "option". Next select "print" tab. Please be sure "document properties" option is unchecked under the "include with document" area.

Here I showed all of this step graphically regarding Microsoft Office 2003.

IN OFFICE 2007 and Above


1. Click on the Microsoft Office button in the top left corner

2. Click on the Word Options button at the bottom

3. Click on the Display link on left

4. Look under the Printing options heading, do you have the Print document properties checked?
   >>> If so, click on it to deselect

5. Click on OK
If that was not your problem please come back with more details.

>>> Is this response helpful? If so, please consider clicking the green Vote As Helpful button for the


Easy Recover Deleted Call History on iPhone 5/4S/4/3GS

You are not realize that you haven’t save the new contacts from the iPhone call history until you clean recent call logs or find nothing when you want to call back from the call history. When encounter such kind of thing, is it possible to recover deleted call history on iPhone?

It is not the end for those iPhone users who urgent to get back their call logs. Few years ago, iTunes backup file is the only way to recover deleted iPhone call logs, and you must have synced your iPhone with iTunes can you use this way.  But now, iPhone data recovery software is a more smart way for iPhone call history, not only supports recover data from iTunes backup, but can recover iPhone data without backup. Then right now, I will share two simple techniques to get back lost call history on iPhone with iPhone Data Recovery software.

Technique One: Recover Deleted iPhone Call History from iTunes Backup 


Above all, you must be sure that you have synced iPhone before lost your call history. If not, please turn to Technique Two directly.
1.    Download iPhone data recovery software from http://www.any-data-recovery.com/product/iphone-data-recovery.html and install it on your computer.
2.    Launch iPhone data recovery software and select “Recover Data from iTunes Backup”. Then you can find all the backup file on your computer be showed on the interface. Just select the backup file need to extract call history and click “Start Scan”.
3.    It will take you few minutes to scan, because not only the call history will be scan but also other files as photos, contacts, text messages are scanned at the same time. After the scanning, you can preview the call history by clicking “Call History”.
4.    The last step is to choose the call logs and tap “Recover”.

Technique Two: Recover deleted iPhone Call logs without Backup


I know, most of you do not have a backup, but it doesn’t matter, iPhone Data Recovery program can restore iPhone call log with no difficulty. Below are the detailed procedures:
Step-1: Select "Recover Data from iOS Device" as recovery mode. Connect your iPhone with computer and launch recovery program.
Step-2: For iPhone 5 & iPhone 4S users, click “Start Scan” to scan for the lost files.
And the iPhone 4 & iPhone 3GS users should enter DFU mode for scanning as the picture described below:


Step 3: After the scanning completed, click “Call History” to preview your lost data. Then choose the call logs need to recover, click “Recover” and save the lost call logs on your computer.

Recovering iPhone call history is not as difficult as you do not read this article before, right? If you have any questions, ask in the comments and I’ll do my best to help you out.

Convert Flash Drive from RAW to FAT32 – Recover Data from RAW Flash Drive Can’t Format Flash Drive from RAW to FAT32


I have a 2GB flash drive. The file type of this flash has been changed to RAW and the capacity of this drive only shows 8MB. I have tried to format it but I failed. It said there are bad sectors on my drive. Please help me! How can I repair the bad sector on my flash drive and format the RAW drive to FAT32? 
The simplest way to format the flash drive is to format it on My Computer. If you this method doesn’t help, you can follow this article and I will introduce other methods to help convert RAW to FAT32. Now I would like to share some information on data recovery before converting RAW drive because data inside RAW drive may get lost forever if you lose the best chance.


Need to Get Back Important Data from the RAW Flash Drive?
When flash drive becomes RAW, it will make us upset and even frustrated because we can’t use the flash drive any more. What is more, all important files inside the drive are also inaccessible. Therefore, there are two important things we need to do when our flash drive becomes RAW – recover data and convert the RAW drive to FAT32 file system.

RAW Drive Recovery Freeware is one of the best software that can recover any lost file from RAW flash drive. With the user-friendly interface, you can easily handle the software to perform the data recovery. The biggest advantage of the recovery software is you can preview the found files after scanning so that you can make a decision if you would like to recover those found files.
How to Recover Data from Flash Drive That Has RAW File System?
Follow the steps below, you will find it is very easy to get back almost all lost data form your RAW flash drive.
Step1. Get the RAW drive recovery software from the download link. Install and run it. Then choose a recovery module.
Step2. Choose the RAW flash drive so that the software will make a quick scan on the selected drive.
Step3. Preview all files when the scan is over.
Step4. Mark all important files and recover them to your computer hard disk or any other storage media. 
How to Format a Flash Drive When It Has Bad Sectors?
You can format the flash drive that has bad sectors with the method below.
Method1. Close all open programs and Windows on your computer. Then click "Start" button ->> open "All Programs" ->> click "Accessories" ->> choose "Command Prompt" ->> type "chkdsk X: /r"(X being the drive letter of your flash drive) ->> "Enter" and wait for the automatic scan and repair of your flash drive.
Method2. Click "Start" button ->> click and open "My Computer" ->> right click on flash drive and choose "Properties" ->> click "Check Now" under "Tools" Tab ->> mark "Automatically Fix File System Errors" and "Scan for and Attempt Recovery of Bad Sectors." ->> Click "Start" option.

DOWNLOAD ICARE SOFTWARE WITH CRACK

Convert RAW to NTFS on External HDD – Solutions on How to Recover Files from RAW Drive & Convert RAW to NTFS


Data inside my 1.5TB external HDD becomes inaccessible due to unknown reasons. I tried to format it but I stopped because I remember I have some important files inside. Now it shows as RAW HDD. I want to convert RAW to NTFS without data loss.

It is certainly that you can convert RAW external HDD to NTFS without data loss. Before you find the solution to change the RAW drive to NTFS, let’s read some other similar RAW problems happened here and there.

1. My GM SATA 160GB external HDD was attacked by virus when I inserted it to my PC. Now all files and folder inside this drive can’t be viewed and the file system of the drive is RAW. Is it possible to change RAW to NTFS?
2. I partitioned my external hard disk drive, after which one partition works fine while the other one is inaccessible. Disk management does identify it as RAW drive. I am attempting to change the drive back into NTFS so that Windows7 can access it.
Solutions to Convert RAW to NTFS with Data Back
If you want to convert RAW to NTFS with its data back, you should recover data first and then format the RAW drive to NTFS. RAW recovery freeware provides the best solution to restore lost files like photos, videos, music, documents, emails etc from RAW file system. It is capable of recovering files from external HDD, hard disk drive, USB flash drive, pen drive, memory card and other devices. 
First RAW Recovery Freeware (Recommend)
Second RAW Recovery Freeware
Step1. Recover Files from External HDD – Recover Data Step by Step with Freeware
Firstly, get back data inside the external HDD with RAW recovery software step by step.
Step one, download install and launch the software. Choose one recovery module.
Step two, choose the RAW external HDD and begin to look for the data inside.
Step three, evaluate the quality of found data and recover them if you are satisfied.
Tip: avoid saving the recovered files to the RAW external.
Want to know more information about Data Recovery from RAW File System?
Step2. Format RAW to NTFS on External HDD
Since you finished the step1 above, you can format the external HDD to convert its file system from RAW to NTFS. You can simply format by following: My computer - >> Right click on the drive of external HDD ->> Click "Format" option to format it - >> Choose the file system. If you can’t format the external HDD with this method, you can also follow this way: My computer -> Manage ->Storage -> Double click Removable Storage -> Right click on the external HDD -> Choose the file system. A number of converting software can also help you change the RAW file system to NTFS. 
DOWNLOAD ICARE SOFTWARE WITH CRACK
 

Poll For This Blog

Infolinks In Text Ads